
Table of Contents
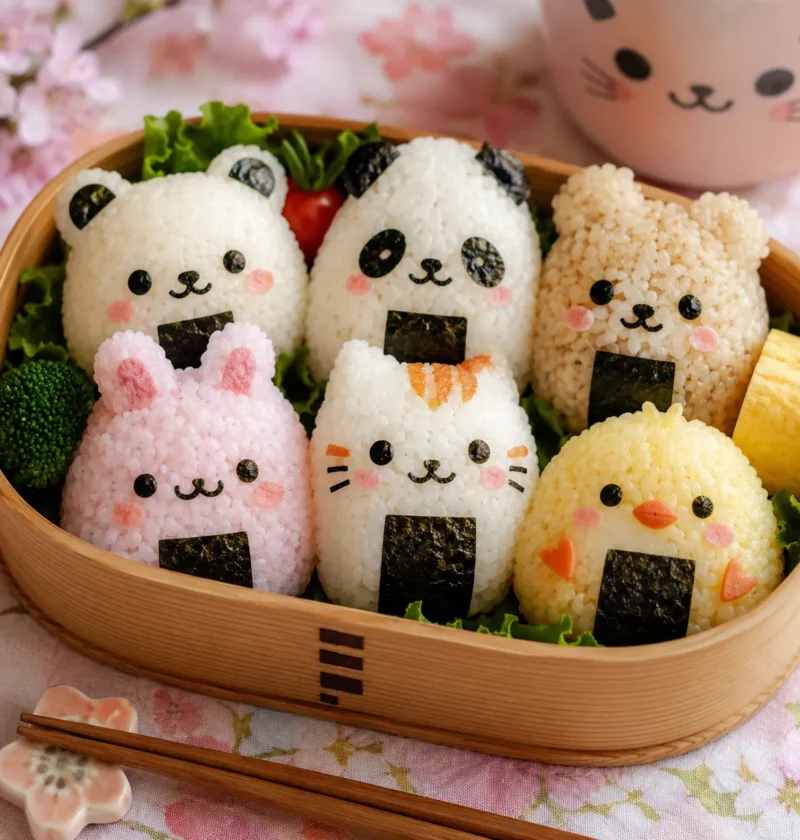
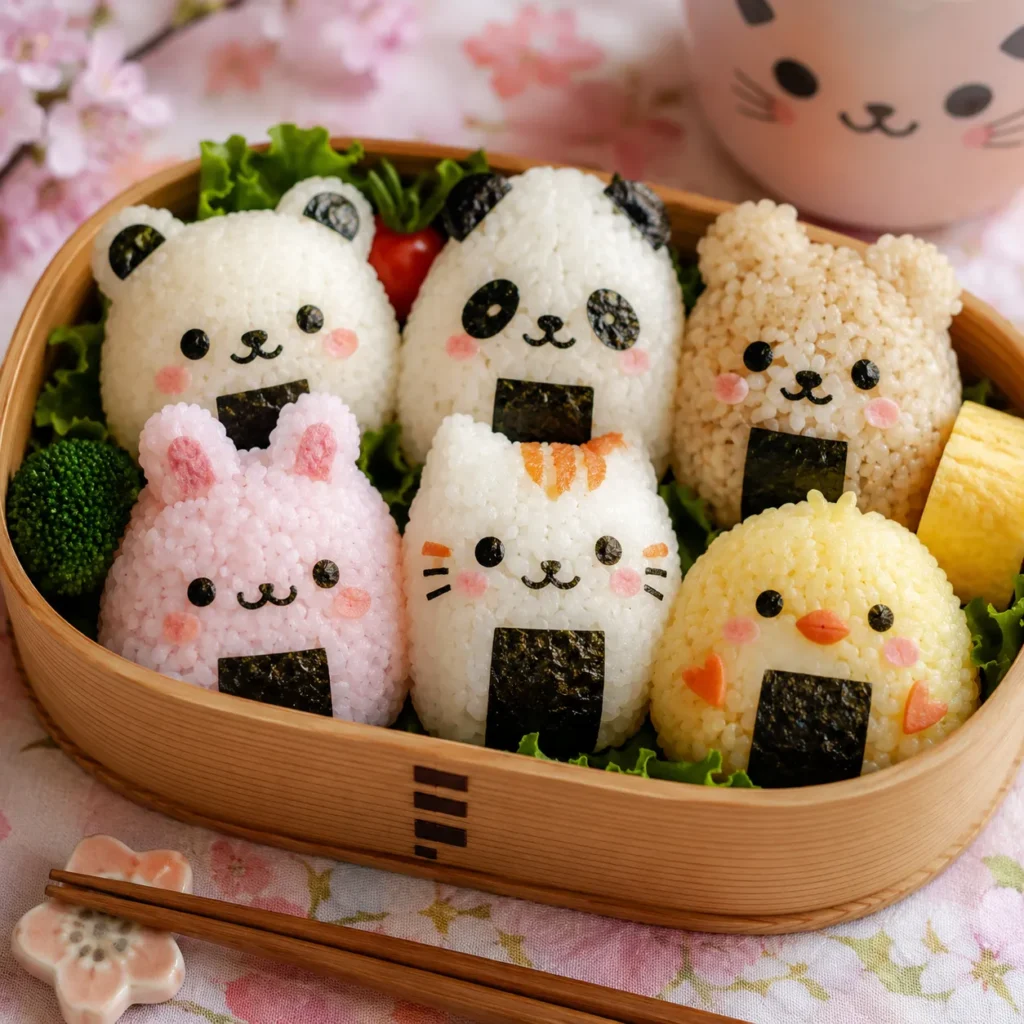
Kawaii Onigiri
Turning a simple rice ball into a tiny character can make even the most ordinary lunch feel special. Kawaii Onigiri are Japanese rice balls shaped into bears, cats, or simple round faces, decorated with nori and cheese to create expressive little characters. The technique follows the same basic steps as character bentos, where seasoned rice is shaped, then detailed with cut seaweed and cheese for features.
The base flavor can stay classic with just salt and a bit of soy sauce, or you can tuck fillings like tuna mayo, salmon, or pickled plum inside. They are portable, customizable, and surprisingly calming to make once you get into a rhythm. If you love kawaii food, bento aesthetics, or fun meal prep, Kawaii Onigiri will quickly become a favorite way to use leftover rice. Here is how to shape and decorate them at home.
WHY YOU’LL LOVE THIS RECIPE
Uses simple rice and pantry staples but looks incredibly cute.
Easy to customize with different fillings and character designs.
Great for lunch boxes, picnics, or snack plates for kids and adults.
Naturally gluten free when you use gluten free fillings.
Fun, hands on project that makes meal prep more enjoyable.
INGREDIENTS
Rice and Seasoning
| Ingredient Group | Ingredient | Amount |
|---|---|---|
| Rice | Cooked Japanese short grain or sushi rice | 3 cups warm |
| Rice | Salt | 1/2 tsp or to taste |
| Rice | Soy sauce (optional, for brown bears) | 1–2 tsp |
Fillings (Optional)
| Ingredient Group | Ingredient | Amount |
|---|---|---|
| Filling | Flaked cooked salmon mixed with a little mayo | About 1/2 cup |
| Filling | Tuna mayo or chicken mayo | About 1/2 cup |
| Filling | Pickled plum (umeboshi), chopped | A few pieces |
Kawaii Faces
| Ingredient Group | Ingredient | Amount |
|---|---|---|
| Faces | Nori sheets | 1–2 sheets |
| Faces | Sliced cheese (white and orange, optional) | 2–3 slices |
| Faces | Mayo or honey (for glue) | Small amount |
Character shaping and face decoration approach adapted from Rilakkuma rice ball bento techniques.
HOW TO MAKE IT (Step-by-Step)
Season the rice (5 minutes)
While the rice is still warm but cool enough to handle, sprinkle with salt and gently fold to distribute. For brown bear style onigiri, mix a small portion of the rice with soy sauce until light brown. Keep the rice covered with a damp towel so it does not dry out.
Prepare the fillings (5 minutes)
Mix cooked salmon with a little mayonnaise, or prepare tuna mayo or chicken mayo fillings. If using pickled plum, remove the pit and chop the flesh. Set the fillings aside in small bowls so you can work efficiently.
Shape the onigiri (10–15 minutes)
Wet your hands with water and sprinkle lightly with salt. Take a portion of rice (about 1/3 cup) and flatten it slightly in your hand. Place a small spoonful of filling in the center if using, then fold the rice around it and press gently into a ball, triangle, or bear head shape. Use molds if you have them, or shape by hand following the method of character bento makers.
Cut nori and cheese for faces (10–15 minutes)
Use small scissors, punches, or a sharp knife to cut nori into eyes, mouths, and noses. Cut cheese into small ovals or circles for muzzles or cheeks. Rilakkuma style bears use white cheese ovals and nori details placed on top.
Assemble the kawaii faces (10 minutes)
Dab a tiny bit of mayo or honey on the back of each cheese piece and nori detail to help it stick. Place cheese ovals where you want the muzzle or cheeks, then add nori eyes, nose, and mouth on top, using tweezers if needed for precision. Keep the faces simple for maximum kawaii charm.
Chill briefly to set (optional, 15–20 minutes)
Place finished Kawaii Onigiri on a tray, cover, and chill briefly so the rice firms up slightly and the faces set in place. Pack into bento boxes or serve on a plate.
MACROS & NUTRITION TABLE
Approximate nutrition per onigiri (plain rice version, 1 of 8, without fillings):
| Nutrition | Amount per onigiri |
|---|---|
| Calories | 150 |
| Protein | 3 g |
| Carbs | 32 g |
| Net Carbs | 32 g |
| Fat | 1 g |
| Fiber | 1 g |
These estimates are based on seasoned sushi rice with a small amount of nori and cheese. Macros will increase with mayo based fillings or richer additions.
PRO TIPS & VARIATIONS
Keep a bowl of salted water nearby to wet your hands; it prevents sticking and lightly seasons the rice.
For more protein, use tuna, salmon, or chicken fillings and pack extra filling in the center.
Make them vegetarian by using seasoned tofu, avocado, or pickled vegetables as fillings.
Use molds and nori punches if you want consistent shapes and quick faces.
For a “forest friends” theme, mix browns, whites, and pale yellow rice to represent different animals.
SERVING SUGGESTIONS
- Pack Kawaii Onigiri into bento boxes with cut fruit, vegetables, and a small treat.
- Serve on a platter for parties alongside soy sauce, pickles, and edamame.
- Use them as a fun lunch centerpiece for kids, pairing with miso soup or a small salad.
STORAGE & REHEATING
- Fridge: Store in an airtight container for up to 1 day for best texture; rice can harden over time.
- Freezer: Onigiri can be frozen without cheese and face details, then wrapped well; reheat in the microwave and decorate after.
- Reheating: If served warm, microwave briefly under a damp paper towel to soften the rice. Avoid overheating or the rice may dry out.
FAQ SECTION (People Also Ask)
Q: Can I make Kawaii Onigiri with leftover rice?
A: Yes, but slightly warm rice is easier to shape. If using cold rice, sprinkle with a bit of water and warm gently so it softens before shaping.
Q: How do I keep the onigiri from falling apart?
A: Press the rice firmly but gently and make sure it is slightly sticky. Short grain Japanese rice holds together better than long grain types.
Q: What is the best rice for onigiri?
A: Japanese short grain or sushi rice is ideal because it is sticky enough to hold shape without being mushy.
Q: Can I make these dairy free?
A: Yes, skip the cheese details and use nori only for faces, or use a dairy free cheese slice if available.
Q: Are Kawaii Onigiri good for picky eaters?
A: The cute faces and small size often make them more appealing to kids and picky eaters, especially if you use familiar fillings like tuna mayo.
CALL TO ACTION
If you shape a batch of Kawaii Onigiri, I would love to hear which characters you tried and which fillings your family liked best. Save this recipe to your bento or kawaii food boards on Pinterest so you can pull it up quickly when packing lunches. If adorable rice shapes are your thing, the next kawaii inspired snack will give you even more ideas.
Kawaii Onigiri
Ingredients
Rice and Seasoning
- 3 cups warm cooked Japanese short grain or sushi rice
- 1/2 teaspoon salt, or to taste
- 1–2 teaspoons soy sauce (optional, for brown “bear” onigiri)
Fillings (Optional)
- About 1/2 cup flaked cooked salmon mixed with a little mayo
- About 1/2 cup tuna mayo or chicken mayo
- A few pieces pickled plum (umeboshi), chopped and pitted
Kawaii Faces
- 1–2 sheets nori, cut into small pieces
- 2–3 slices cheese (white and orange, optional)
- Small amount of mayo or honey (for “glue”)
Instructions
- Season the rice (5 minutes): While the rice is still warm but cool enough to handle, sprinkle with salt and gently fold to distribute. For brown bear style onigiri, mix a small portion of the rice with soy sauce until light brown. Keep the rice covered with a damp towel so it does not dry out.
- Prepare the fillings (5 minutes): Mix cooked salmon with a little mayonnaise, or prepare tuna mayo or chicken mayo fillings. If using pickled plum, remove the pit and chop the flesh. Set the fillings aside in small bowls.
- Shape the onigiri (10–15 minutes): Keep a bowl of water nearby and lightly wet your hands, then sprinkle them with a little salt. Take about 1/3 cup of rice and flatten it slightly in your hand. Place a small spoonful of filling in the center if using, then fold the rice around it and press gently into a ball, triangle, or bear head shape. Use molds if you have them, or shape by hand.
- Cut nori and cheese for faces (10–15 minutes): Use small scissors, punches, or a sharp knife to cut nori into eyes, mouths, and noses. Cut cheese into small ovals or circles for muzzles or cheeks.
- Assemble the kawaii faces (10 minutes): Dab a tiny bit of mayo or honey on the back of each cheese piece and nori detail to help them stick. Place cheese ovals where you want the muzzle or cheeks, then add nori eyes, nose, and mouth on top, using tweezers if needed for precision.
- Chill briefly to set (optional, 15–20 minutes): Place the finished Kawaii Onigiri on a tray, cover, and chill briefly so the rice firms up slightly and the faces set in place. Pack into bento boxes or serve on a plate.
Nutrition
Approximate nutrition per onigiri (plain rice version, 1 of 8, without fillings):
| Calories | 150 |
| Protein | 3 g |
| Carbs | 32 g |
| Net Carbs | 32 g |
| Fat | 1 g |
| Fiber | 1 g |
These estimates are based on seasoned sushi rice with a small amount of nori and cheese. Macros will increase with mayo-based fillings or richer additions.