Table of Contents
Healthy Magic Cookie Bars (Gluten & Dairy Free!)
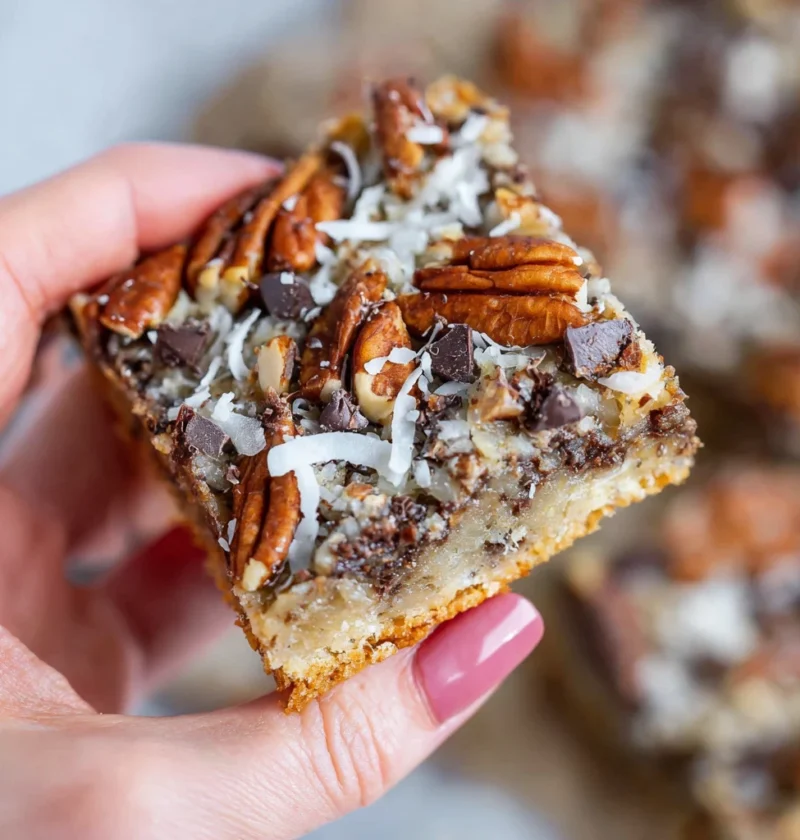
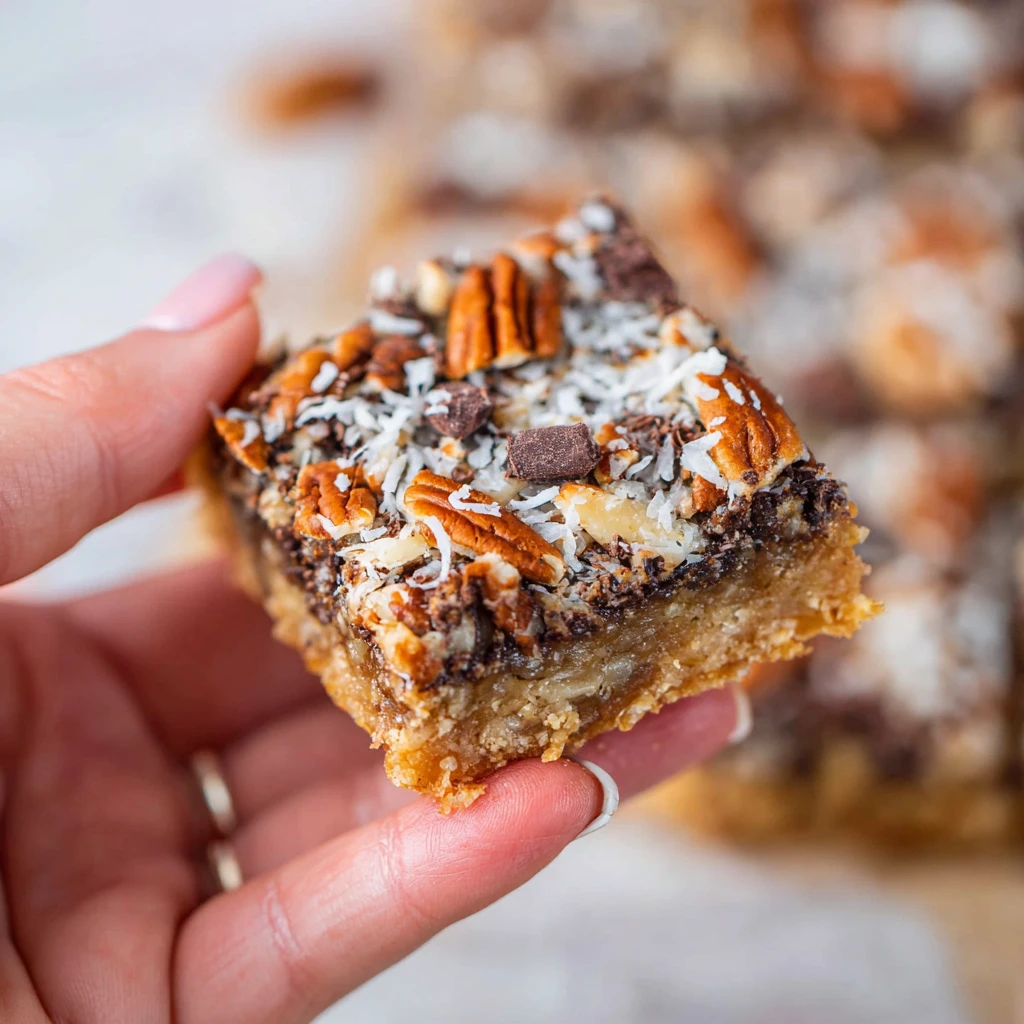
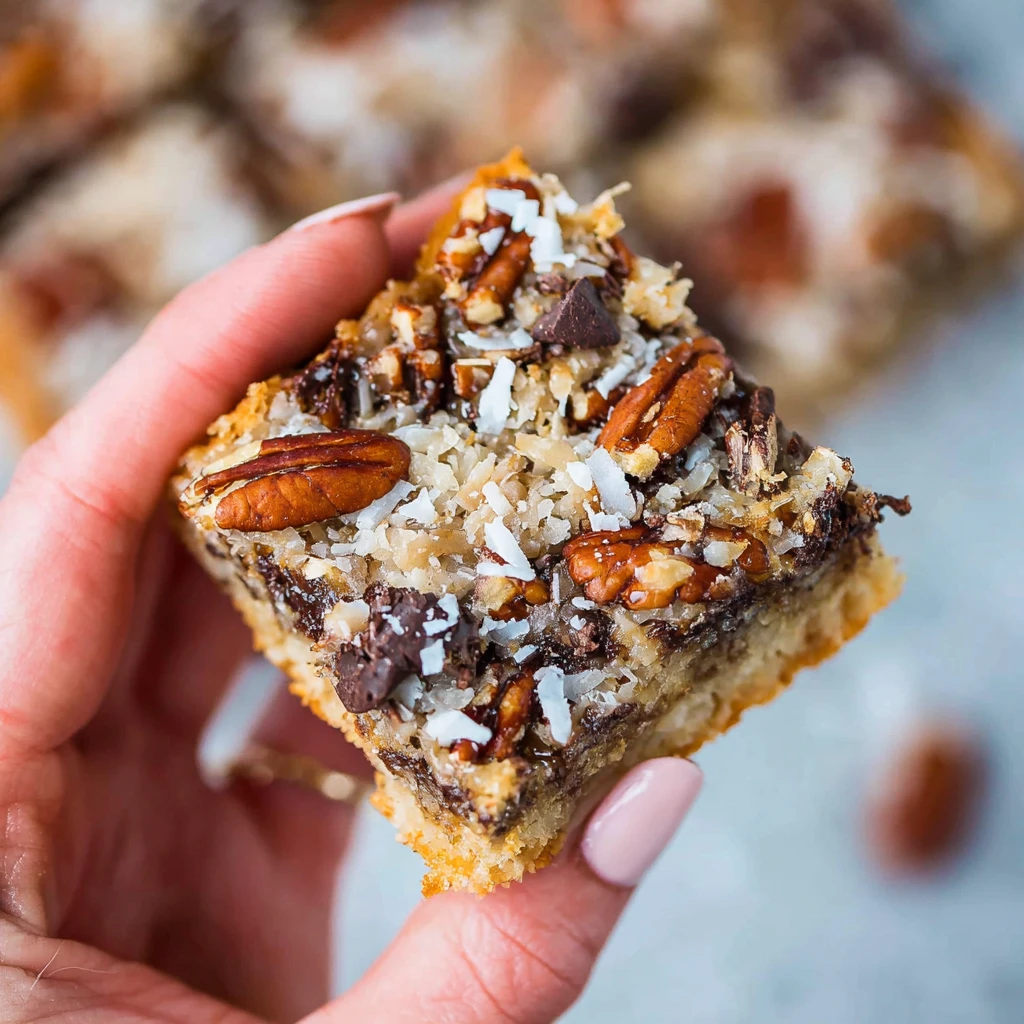
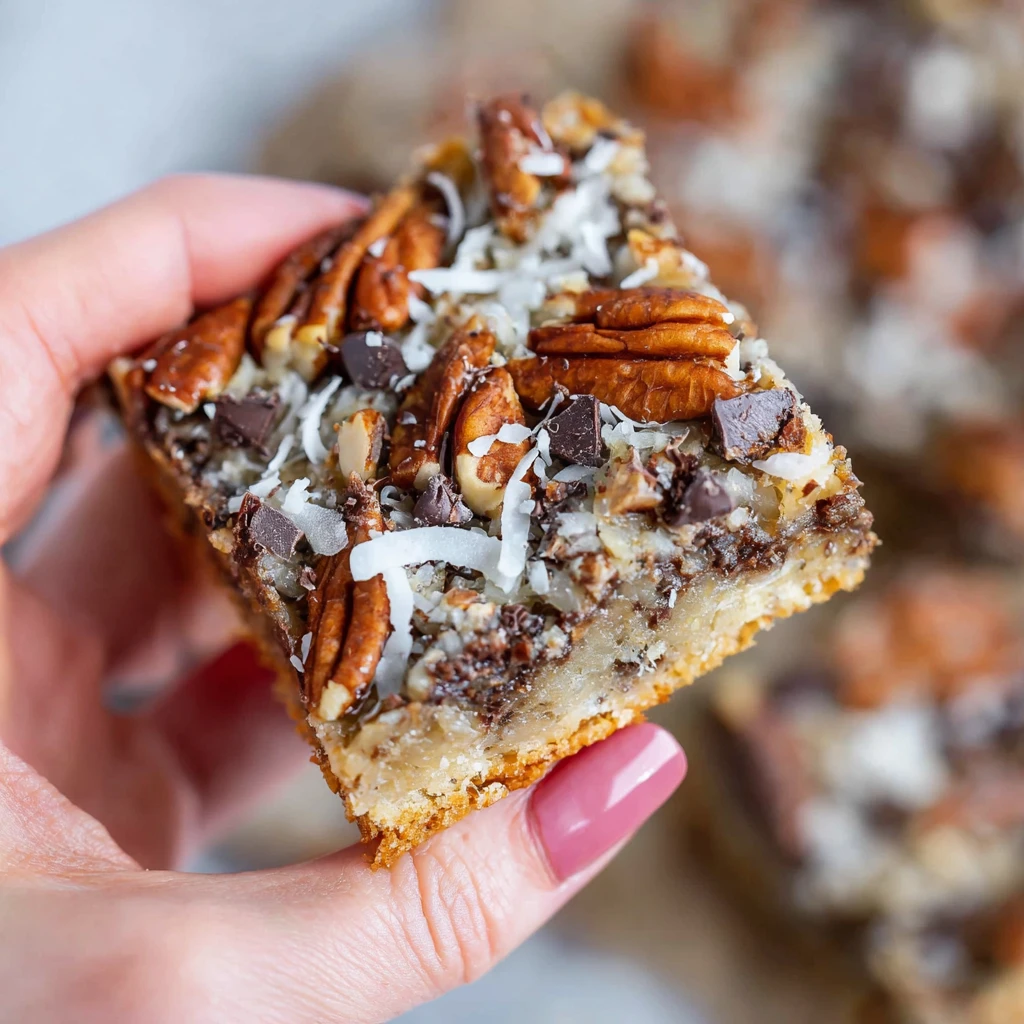
Imagine biting into a chewy, layered bar where a crisp oat-nut base gives way to clouds of toasted coconut, pockets of melted dark chocolate, and a rich, caramel-like center—all held together by a whisper of vanilla and sea salt. It’s nostalgic comfort food reimagined: no refined flour, no dairy, no refined sugar, yet utterly satisfying. These bars come together in under 30 minutes (mostly hands-off baking), require just one bowl and a pan, and slice into neat, portable squares perfect for lunchboxes, post-workout snacks, or sharing with friends who’ll never guess they’re gluten-free and dairy-free.
Whether you’re managing food sensitivities, cleaning up your pantry, or simply craving a treat that loves you back, these magic cookie bars deliver. Inspired by the classic seven-layer bar but rebuilt with wholesome ingredients, this version focuses on texture contrast (crisp base, chewy middle, melty top) and depth of flavor (toasted coconut, dark chocolate, warm spices) while keeping prep blissfully simple.
Why You’ll Love This Recipe
- Truly gluten-free & dairy-free: Uses certified GF oats, coconut oil, and plant-based “condensed milk” substitutes—no hidden allergens.
- Refined-sugar conscious: Sweetened with maple syrup, coconut sugar, and dates—avoiding the spike-and-crash of white sugar.
- One-bowl, one-pan simplicity: Mix crust, layer toppings, bake—cleanup takes 2 minutes.
- Make-ahead magic: Bake a batch, store, and enjoy ready-to-go squares all week.
- Kid-approved (and adult-loved): The coconut-chocolate combo feels like a treat; parents appreciate the fiber, healthy fats, and protein from oats and nuts.
- Freezer-friendly: Wrap squares individually and freeze for up to 3 months—thaw at room temperature for 10 minutes.
- Adaptable to your pantry: Swap nuts, seeds, or dried fruit based on what’s on hand—no specialty ingredients required.
Ingredients: Wholesome Layers, Thoughtfully Chosen
This recipe makes a 9×13-inch pan (about 24 bars). Measurements prioritize balance and accessibility, with clear swaps for common dietary needs.
For the Crust (Gluten-Free & Dairy-Free Base)
| Ingredient | Amount | Notes & Substitutions |
|---|---|---|
| Gluten-free rolled oats | 1½ cups (150g) | Ensure certified GF if highly sensitive; pulse in blender for finer texture if desired |
| Chopped nuts | ½ cup (60g) | Almonds, pecans, or walnuts work well—raw or lightly toasted |
| Unsweetened shredded coconut | ½ cup (45g) | Adds chew and tropical notes; omit if preferred |
| Coconut oil | ¼ cup (60ml), melted | Replaces butter; solid at room temp but melts easily—avocado oil works too |
| Maple syrup | 3 Tbsp (45ml) | Natural binder and sweetener; sub with honey if not vegan |
| Vanilla extract | 1 tsp | Enhances warmth—don’t skip! |
| Pinch of sea salt | – | Balances sweetness and enhances nutty notes |
For the Layers (Customizable & Nutrient-Dense)
| Ingredient | Amount | Notes & Substitutions |
|---|---|---|
| Unsweetened shredded coconut | 1 cup (90g) | Toasted for deeper flavor—see Tips |
| Dairy-free chocolate chips | 1 cup (170g) | Look for >70% cacao, soy/lecithin-free if sensitive; Enjoy Life or Hu Kitchen work |
| Chopped nuts | ½ cup (60g) | Same as crust or try pistachios/macadamias for variety |
| Dairy-free “condensed milk” | 1 cup (240ml) | Key layer—see simple homemade version below or use store-bought (like Nature’s Charm) |
| Optional add-ins | ¼ cup dried cranberries, 2 Tbsp chia seeds, or ½ tsp cinnamon for warmth |
Homemade Dairy-Free Condensed Milk (Makes 1 cup)
| Ingredient | Amount | Notes |
|---|---|---|
| Full-fat coconut milk | 2 cups (480ml) | Use the solid cream from a can—shake well first if not separated |
| Maple syrup | ⅓ cup (80ml) | Adjust to taste; start with ¼ cup for less sweet |
| Vanilla extract | ½ tsp | Optional but recommended |
| Pinch of salt | – | Enhances caramel notes |
→ Pro Tip: Simmer coconut milk and maple syrup in a saucepan over medium-low heat for 20-25 minutes, stirring occasionally, until reduced by half and thickened to a syrup that coats the back of a spoon. Cool slightly before using—it will thicken further as it chills.
Note: This entire recipe is naturally gluten-free (if using certified GF oats), dairy-free, and adaptable to vegan (use maple syrup, not honey). For nut-free, swap nuts for sunflower or pumpkin seeds in crust and layers.
Step-by-Step Instructions
Prep Time: 10 minutes | Cook Time: 20-25 minutes | Total Time: 30 minutes | Servings: 24 bars
Prep your pan & oven. Preheat oven to 350°F (175°C). Line a 9×13-inch baking dish with parchment paper, leaving overhang on sides for easy lifting.
→ Pro Tip: Parchment prevents sticking and makes cleanup effortless—no greasing needed!
Make the crust. In a medium bowl, combine oats, chopped nuts, coconut (if using), melted coconut oil, maple syrup, vanilla, and salt. Stir until evenly moistened and clumpy—it should hold together when pressed.
→ Pro Tip: For a finer crust, pulse oats in a blender 5-6 times before mixing; for chunkier, leave oats whole.
Press the crust. Firmly press the mixture into an even layer across the bottom of the prepared dish. Use the bottom of a measuring cup or your fingers (dipped in water to prevent sticking) to create a smooth, compact base.
→ Pro Tip: Pressing firmly ensures crisp edges and prevents crumbling when sliced.
Toast the coconut (optional but recommended). Spread 1 cup shredded coconut on a small baking sheet and toast in the oven for 3-4 minutes until golden and fragrant—watch closely as it burns easily! Let cool slightly.
→ Pro Tip: Toasting deepens coconut flavor and adds crunch—worth the extra 5 minutes.
Layer the toppings. Over the crust, evenly sprinkle:
Toasted coconut (or untoasted if skipping step 4)
Dairy-free chocolate chips
Chopped nuts
Any optional add-ins (cranberries, seeds, cinnamon)
→ Pro Tip: Distribute layers evenly but don’t overfill—aim for a single, cohesive layer that won’t slide when baked.
Add the condensed milk layer. Slowly pour the homemade (or store-bought) dairy-free condensed milk over the top, spreading gently with a spatula to reach all corners. It should cover the layers like a golden blanket.
→ Pro Tip: Pour slowly to avoid displacing the dry layers—tilt the pan and let it flow naturally.
Bake to golden perfection. Slide the dish into the oven and bake 20-25 minutes, until the edges are lightly golden and the center is set (no longer jiggly). The top should look lightly toasted, not dark brown.
→ Pro Tip: Start checking at 18 minutes—oven variances mean bars can go from perfect to overdone quickly.
Cool completely. Let bars cool in the pan on a wire rack for at least 2 hours (or refrigerate for 1 hour). This is non-negotiable for clean slices—the filling needs time to firm up.
→ Pro Tip: Rushing this step results in gooey, hard-to-cut bars; patience yields neat, professional-looking squares.
Slice & serve. Lift the bars out of the pan using the parchment overhang. Place on a cutting board and slice into 24 even squares (or 12 larger bars) using a sharp knife dipped in hot water and wiped clean between cuts.
Tips for Success: Perfect Texture & Clean Slices Every Time
Even a simple layered bar benefits from a few expert pointers. These tips, honed from testing and trusted sources, will help you avoid soggy crusts, uneven layers, or bars that fall apart.
- Press crust firmly: A loose base crumbles when sliced—use firm pressure with a flat tool.
- Toast coconut for depth: Raw coconut tastes flat; toasting brings out nutty, caramel notes that elevate the whole bar.
- Don’t skip the cooling time: The condensed milk layer needs to set fully—cutting warm bars guarantees a mess.
- Use a sharp knife for clean cuts: A dull knife drags through layers; dip in hot water and wipe dry between slices for neat edges.
- Adjust sweetness to taste: If your chocolate chips are very sweet, reduce maple syrup in crust by 1 Tbsp; if using unsweetened chocolate, add 1 Tbsp to condensed milk.
- Check oat freshness: Stale oats taste cardboard-y—sniff before using; they should smell nutty and fresh.
- For extra-chewy bars: Add 2 Tbsp chia seeds or ground flax to the crust mixture—they absorb moisture and enhance texture.
Variations & Substitutions: Make Them Yours
This recipe is a fantastic canvas—here’s how to adapt it for different tastes, diets, or what’s in your fridge. All swaps keep the core layering method intact.
Dietary Adaptations
- Nut-free: Replace nuts in crust and layers with sunflower seeds, pumpkin seeds, or toasted oats; increase seeds in condensed milk layer for binding.
- Lower-sugar: Reduce maple syrup in crust to 2 Tbsp; use unsweetened coconut milk and 2 Tbsp maple syrup for condensed milk; choose 85%+ dark chocolate chips.
- Paleo: Use almond flour (1 cup) + ¼ cup coconut flour for crust (add 1 extra Tbsp oil); skip oats entirely; ensure chocolate chips are paleo-compliant.
- Refined-sugar free: Rely on maple syrup, coconut sugar, and dates—ensure chocolate chips are sweetened with coconut sugar or monk fruit.
- Extra protein boost: Stir 2 Tbsp collagen peptides or unflavored protein powder into the crust mixture; add ¼ cup hemp seeds to layers.
Flavor & Texture Twists
- Tropical twist: Use macadamia nuts, dried mango, and white chocolate chips (dairy-free); add ½ tsp lime zest to condensed milk.
- Spicy-sweet: Mix ¼ tsp cayenne or chipotle powder into crust; top with candied ginger pieces.
- Coffee lover: Add 1 Tbsp instant espresso powder to crust; use mocha-flavored dairy-free chocolate chips.
- Seed-centric: Swap all nuts for a mix of pepitas, sunflower seeds, and hemp seeds; toast layers for crunch.
- Minimalist: Omit chocolate chips and nuts—just crust, toasted coconut, and condensed milk for a “two-layer” bar that’s still magical.
What to Serve With It: Building Your Perfect Snack Plate
These bars are stellar solo, but pairing them with fresh, bright, or creamy elements turns a simple treat into a balanced snack.
Beverage Pairings
- Hot herbal tea (chamomile, rooibos, or peppermint): Soothes and complements the warm spices.
- Iced matcha latte: The earthy bitterness cuts through sweetness beautifully.
- Golden milk latte: Turmeric + cinnamon in both creates a cozy, anti-inflammatory duo.
- Sparkling water with citrus: Add orange or grapefruit slices for a palate-cleansing bubble.
Fresh & Crunchy Sides
- Apple or pear slices: The crisp fruit contrasts the chewy bar and adds fiber.
- Berry medley: A handful of raspberries or blackberries adds tartness and antioxidants.
- Veggie sticks with nut butter: Carrot or celery sticks alongside 1 Tbsp almond butter for dipping.
- Simple green salad: Toss mixed greens with cucumber, cherry tomatoes, and a lemon-olive oil vinaigrette.
Extra‑Special Add‑Ons
- Nut butter drizzle: Warm 1 Tbsp peanut or almond butter and drizzle over the plate for richness.
- Fresh fruit compote: Simmer berries with a splash of water and lemon juice until thickened; spoon warm beside the bars.
- Whipped coconut cream: Chill a can of full-fat coconut milk, scoop out the solid cream, and whip with vanilla for a dairy-free topping.
Storage & Reheating: Keep Them Fresh for Days
How to Store
- Room temperature (short-term): Place cooled bars in an airtight container with a paper towel to absorb moisture. They’ll stay fresh for 4-5 days in a cool, dry pantry.
- Refrigeration: For longer storage or warm climates, keep in an airtight container in the fridge for up to 2 weeks. Let sit at room temperature 10 minutes before eating for optimal texture.
- Freezing: Wrap individual bars tightly in parchment then foil, or place layers between parchment in a freezer-safe bag. Freezes well for up to 3 months. Thaw at room temperature for 20-30 minutes or enjoy straight from the freezer for a firmer, fudgier texture.
Pro Tips for Longevity
- Revive dry bars: If bars feel stiff after storage, wrap in a damp paper towel and microwave for 10 Plan: 5 minutes
- Prevent sticking: Place a small piece of parchment between layers when storing.
- Check for freshness: Discard if bars develop an off smell or visible mold—though rare with proper storage.
Nutrition Facts: Fuel Your Day Right
This estimates per bar (1/24 of recipe), based on crust (oats, nuts, coconut oil, maple syrup), layers (toasted coconut, dairy-free chocolate chips, nuts), and homemade condensed milk (coconut milk, maple syrup). Values vary with brands and optional add-ins.
| Nutrient | Amount per Bar | % Daily Value* | Why It Matters |
|---|---|---|---|
| Calories | 120-150 | 6-8% | Provides satisfying energy for a snack without heaviness. |
| Total Fat | 6-8g | 8-10% | Primarily from coconut oil, nuts, and chocolate—includes heart-healthy fats. |
| Saturated Fat | 3-4g | 15-20% | From coconut oil and chocolate; enjoy as part of a balanced diet. |
| Cholesterol | 0mg | 0% | Naturally cholesterol-free as a plant-based treat. |
| Sodium | 50-80mg | 2-3% | Enhances flavor; comes from added salt and natural sodium in ingredients. |
| Total Carbohydrate | 12-15g | 4-5% | Primarily from oats, coconut, and maple syrup—complex carbs for lasting energy. |
| Fiber | 2-3g | 8-12% | Oats, nuts, and coconut deliver soluble and insoluble fiber for digestion. |
| Sugars | 8-10g | — | Naturally occurring from coconut, maple syrup, and chocolate; no refined sugar. |
| Protein | 2-3g | 4-6% | From oats, nuts, and seeds—supports muscle maintenance and satiety. |
| Calcium | 20-30mg | 2-3% | From coconut milk and nuts—important for bone health. |
| Iron | 0.5-0.8mg | 3-4% | From oats, nuts, and chocolate—supports oxygen transport. |
| Potassium | 100-150mg | 2-3% | From coconut and nuts—helps regulate fluid balance and muscle function. |
Based on a 2,000‑calorie diet. Percent Daily Values are approximate and assume standard ingredient brands.
Dietary highlights:
- ✅ Refined-sugar conscious: Relies on natural sweeteners—avoids the sugar crash of traditional versions.
- ✅ Good source of fiber: Supports digestive health and helps maintain steady blood sugar levels between meals.
- ✅ Rich in healthy fats: Coconut oil and nuts provide medium-chain triglycerides and omega-6s for sustained energy.
- ✅ Adaptable to allergies: Easily made nut-free, soy-free, or gluten-free with simple swaps.
- ⚠️ Watch portions if calorie-conscious: While nutrient-dense, they’re energy-dense—stick to 1 bar per snack for balanced intake.
- 💡 Boost the snack: Pair with a handful of raw walnuts or a string cheese (if dairy-tolerant) for extra protein and fat to prolong satiety.
Common Mistakes to Avoid
Even experienced bakers slip up—here are the pitfalls I see most often, plus how to dodge them.
- Skipping the crust press: Results in a crumbly base that falls apart when sliced. Fix: Press firmly with a flat tool—your fingers or a measuring cup bottom work great.
- Using wet coconut oil: Solid coconut oil is key for binding; if it’s melted and re-solidified unevenly, texture suffers. Fix: Use freshly melted oil or ensure it’s uniformly solid before mixing.
- Overbaking: Causes bars to dry out and crack. Fix: Start checking at 18 minutes—remove when edges are golden and center is just set.
- Cutting before fully cooled: Leads to gooey, messy slices. Fix: Cool completely (2+ hours at room temp or 1 hour in fridge)—non-negotiable for clean cuts.
- Using sweetened condensed milk by mistake: Regular condensed milk contains dairy and often more sugar. Fix: Double-check labels—look for “dairy-free” or “vegan” and coconut milk as the first ingredient.
- Skipping the parchment liner: Makes removal impossible without breaking bars. Fix: Always line the pan—it’s worth the extra 10 seconds.
- Using stale oats or nuts: Leads to cardboard-like or rancid flavors. Fix: Store oats and nuts in airtight containers in the fridge or freezer to prolong freshness.
- Adding too much liquid to crust: Makes it soggy and prevents crisping. Fix: Mix until just combined—it should feel damp but not wet.
- Not toasting coconut (if using): Misses a chance to deepen flavor. Fix: Takes 4 minutes—worth it for complexity.
- Using a dull knife for cutting: Tears layers and creates uneven slices. Fix: Use a sharp chef’s knife, dipped in hot water and wiped dry between cuts.
FAQ: Your Magic Cookie Bar Questions Answered
Q: Can I make these bars nut-free for school lunches?
A: Absolutely! Replace all nuts with seeds (sunflower, pumpkin, or hemp) in both crust and layers. Ensure your facility allows seeds—many schools permit seed-based treats as nut-free alternatives.
Q: How do I make the condensed milk layer thicker if it’s too runny?
A: Simmer the homemade version 5 minutes longer, or chill it thoroughly before pouring—it thickens as it cools. Store-bought versions vary; shake well before using.
Q: Can I use regular oats if I don’t need gluten-free?
A: Yes! Use old-fashioned rolled oats for the crust—no adjustment needed.
Q: My bars stuck to the pan—what went wrong?
A: Likely due to skipping parchment or using insufficient oil in the crust. Fix: Always line with parchment; ensure coconut oil is fully incorporated into the crust mix.
Q: How long do homemade condensed milk last?
A: Store in a jar in the fridge for up to 2 weeks—or freeze in ice cube trays for longer storage.
Q: Can I add a layer of peanut butter?
A: Yes! Swirl ¼ cup melted peanut butter (or sunflower seed butter for nut-free) over the chocolate chip layer before adding condensed milk.
Q: Are these bars suitable for a diabetic diet?
A: They’re lower in refined sugar than traditional versions, but still contain natural sugars from maple syrup and coconut. Pair with protein (like nuts or cheese) to slow absorption—and consult your dietitian for personalized advice.
Q: Can I make these bars oil-free?
A: The crust needs fat to bind—try substituting coconut oil with ¼ cup unsweetened applesauce or mashed banana, but expect a softer, more cake-like base. For true oil-free, increase oats to 2 cups and add 2 Tbsp chia seeds soaked in ¼ cup water.
Q: Why did my chocolate chips not melt?
A: Some dairy-free chips (especially those with high cocoa content) hold their shape when baked—this is normal! They’ll soften and create pockets of melty chocolate. For full melt, use chips formulated for baking (like Enjoy Life’s semi-sweet).
Conclusion: Your Go-To Guilt-Free Treat
There you have it—a complete guide to making healthy magic cookie bars that are gluten-free, dairy-free, refined-sugar conscious, and utterly delicious, all from your home kitchen. This recipe isn’t just about following steps; it’s about understanding the why behind each technique—pressing the crust firmly for a sturdy base, toasting coconut for depth of flavor, cooling completely for clean slices, and layering thoughtfully to create that magical contrast of textures and flavors. Each bar delivers a satisfying blend of chewy coconut, melty chocolate, nutty crunch, and a rich, caramel-like center—without the guilt or the crash.
Whether you’re meal-prepping for a hectic week, packing snacks for kids’ lunches, or simply craving a treat that loves you back, these bars deliver on flavor, texture, and that incredible “I made this!” pride. Make a batch on Sunday, store them in the fridge or freezer, and you’ll have a reliable, nourishing snack ready whenever hunger strikes.
Now, it’s your turn. Grab your oats, toast that coconut, and listen for the soft shush as the crust mixture hits the bowl. Feel the mixture clump together as you stir in the melted coconut oil and maple syrup—see how it holds its shape when you press a handful into your palm. Then, layer the toppings like a painter: clouds of toasted coconut, pockets of dark chocolate, sprinkles of nuts, and finally, that golden ribbon of condensed milk.
As the bars bake, watch the edges turn golden and the center set—knowing you’re creating something truly special. After a patient cool, lift the parchment, slice with a sharp knife, and take that first bite. Notice how the crisp oat-nut base gives way to chewy coconut, how the chocolate chips melt into rich pools, and how the condensed milk layer ties everything together with a whisper of vanilla and sea salt. That’s the taste of a treat made with intention—a snack worth savoring, sharing, and returning to again and again.
If you try this recipe, I’d love to hear how it turned out! Drop a comment below telling me what you tweaked (did you add a pinch of sea salt flakes on top? use dried cherries and almonds? serve them with a side of apple slices and almond butter?), or tag me in your photo on social media—I’m always inspired by your creations. And if these bars became your new favorite, please share this post with a friend who needs an easy, impressive snack idea. Sharing is how we grow this little corner of the internet into a place where everyone feels welcome to mix, layer, and enjoy.
Hungry for more? Try these next:
- Baked Greek Lentil Meatballs with Tzatziki – Easy High-Protein Dinner
- Chipotle Lime Chicken Salad
- Quiche Stuffed Bagels: Breakfast for Busy Mornings
Happy baking, friends. May your bars be golden, your layers distinct, and your moments filled with the simple joy of a perfectly crafted, healthy magic cookie bar.
Healthy Magic Cookie Bars (Gluten and Dairy Free!)
Indulge in the delightful flavors of these gluten and dairy-free Healthy Magic Cookie Bars that offer a perfect balance of sweetness, crunchiness, and chewiness. With a blend of wholesome ingredients like almond flour, coconut oil, chocolate, and nuts, these bars are not only delicious but also guilt-free. Embark on a magical baking journey with this enchanting dessert that is sure to leave you spellbound!
Ingredients
- Almond flour
- Coconut oil
- Maple syrup
- Shredded coconut
- Dairy-free chocolate chips
- Chopped nuts (almonds or pecans)
- Vanilla extract
Directions
-
Preheat your oven to 350°F and line a baking dish with parchment paper.
-
In a mixing bowl, combine almond flour, melted coconut oil, maple syrup, and vanilla extract to form the base layer.
-
Press the mixture into the bottom of the prepared baking dish to create an even layer.
-
Sprinkle shredded coconut, dairy-free chocolate chips, and chopped nuts over the base layer.
-
Drizzle additional maple syrup over the toppings to enhance the sweetness.
-
Bake in the preheated oven for 25-30 minutes until the edges are golden brown.
-
Allow the bars to cool before slicing them into squares and indulging in the magic!